Where can you use Button-fix in a kitchen fit-out?
July 13, 2022
This interactive diagram, with 'X-ray vision', reveals some of the many varied ways the hidden fasteners can be used.
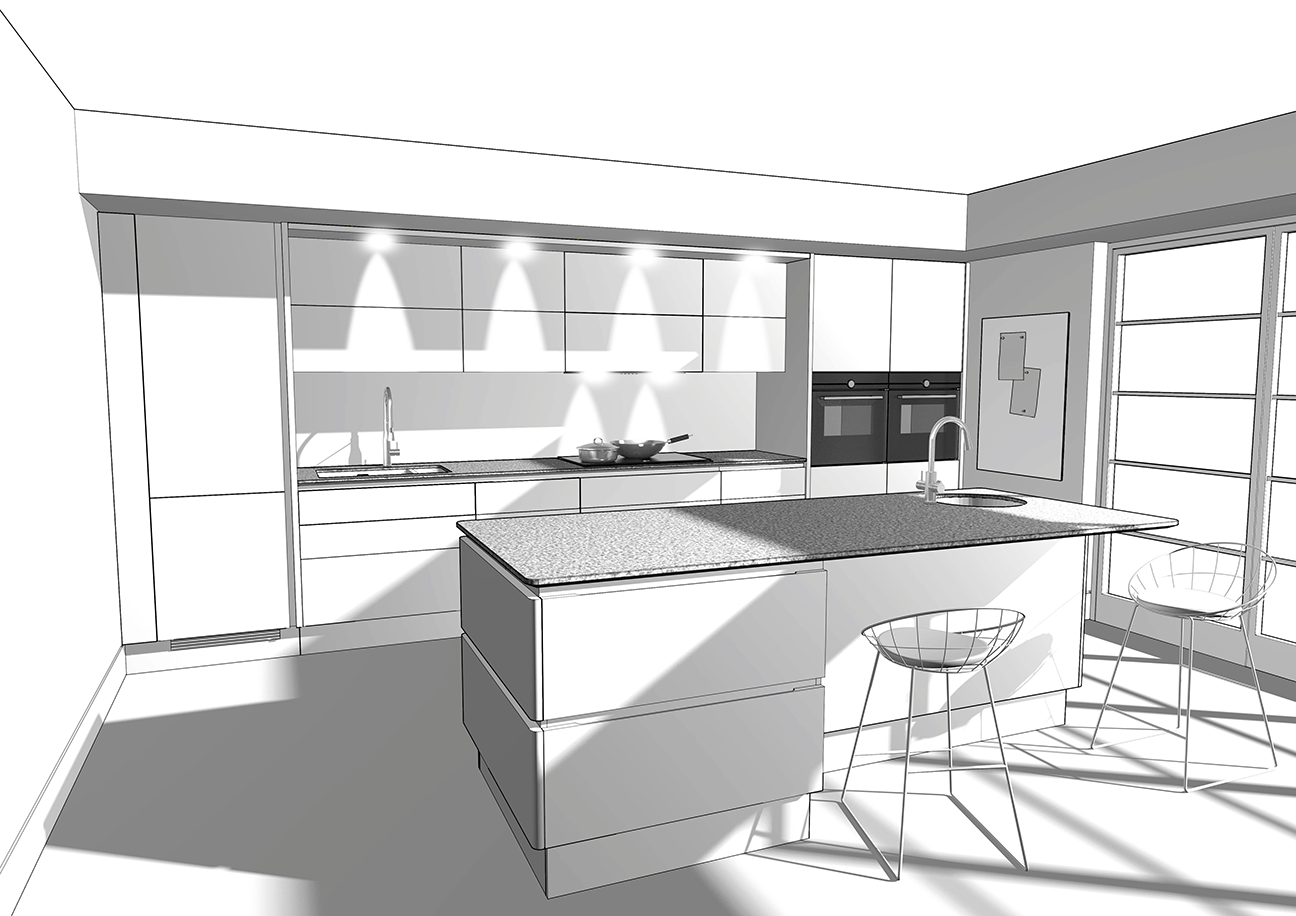


Click on any of the ten hot spots to see how Button-fix works behind the scenes to provide secure hidden fixings for the kitchen elements. Easy to install and dependably strong, Button-fix still allows elements to be removable, to give access to services behind or for repair and refurbishment. Swipe across the close-up details and the hidden fixings will reveal themselves!
Some of the applications for Button-fix in a kitchen fit-out include:
- Mounting dummy door and drawer fronts. When aiming for a streamlined appearance, you may want the materials and lines of the cabinet fronts to continue in front of built-in appliances and fixtures, for example, the sink bowls and an integrated cooker hood. The Type 2 Button-fix securely holds these decorative panels to the cabinet carcass, while allowing removal whenever maintenance is required.
- Attaching infill panels at the end of run. Room sizes are rarely an exact match to kitchen carcass modules, or there may be pipework in a corner that prevents the carcasses fitting wall-to-wall. In cases such as these, an infill panel can be push-fitted into place, using Type 2 Button-fix to connect the panel to the cabinet carcass on one side and to a softwood wall batten on the other.
- Cladding island and peninsular units. When all sides of a unit are exposed, you may want to clad the carcasses to continue the lines and materials of the cabinet fronts. Here we’ve used Type 1 Flush to mount the end panels and Type 2 to fix the panel across the rear of the carcasses. In this example the shadow gap detail on the end panels allows the Type 1 Flush fasteners to engage vertically. If your design requires the cladding to be a close fit to the work surface, simply orientate the Button-fix for sideways engagement.
- Securely fixing the skirting kick plates. Clipping the skirting to the plinth legs is fine, but there are occasions when you will want a more secure solution, that is perfectly aligned even after the skirting has been on and off a few times. The Type 2 Button-fix can be used to reinforce skirting corners and to ensure they hold tightly together. And if your cabinet carcasses are designed to go down close to the floor (not raised on tall legs), you could use Type 2 to mount all the skirtings. This is ideal where there are built-in appliances such as dishwashers, where the skirting may need to be removed every time the appliance is serviced.
- Creating removable cabinet back panels for service access. The electricians and plumbers may have located electrical consumer units or stop valves on the wall behind a cupboard. Hidden from view in daily operation, these features need to be easily accessible in an emergency. Mounting a false back panel inside the cabinet using Type 2 Button-fix is the easiest solution.
- Hanging pelmet panels at ceiling level or on the underside of wall cabinets. The Type 1 Button-fix fastener can be used to safely mount horizontal panels such as ceiling pelmets. When surface-mounted it creates an 8mm stand-off; alternatively the fitting can be semi-recessed to reduce the gap to only 3mm. A useful gap for running low-voltage cables to downlighting.
- Providing a concealed fixing for notice boards and magnetic white boards. Every kitchen needs somewhere to leave reminder notes or display the children’s latest artwork. The Type 1 Bonded Button-fix is an ideal secret mount for thin panels made from metal or glass or thin-backed cork – there’s no need for screw fixing into the panel. When attaching the mating Buttons directly to wall anchors we recommend using ‘penny’ or ‘fender’ washers to spread the load on the plasterboard/drywall.
Feel free to contact our technical team for advice on your specific application.
.jpg)

.jpg)